ONLINE JOURNAL
These journal entries track our progress as we undertake our adventure of restoring this very old home. The main reason for keeping this journal on the web is that we have found that there are very few resources (books or websites) that follow all of the trials and tribulations of restoring an old home...from start to finish.
September 2, 2002
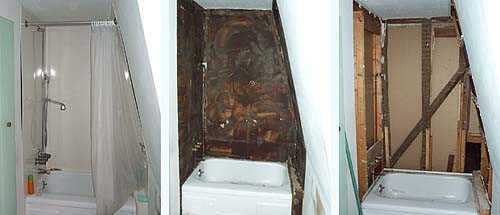
This weekend we were slowed by rain and small-town retail practices. We're not complaining about the rain. We sure needed it. And we were happy to pick a project indoors. The upstairs bathroom was a good candidate. The tiny bathtub (yes, it's really as small as it looks) had panels glued to the wall above it to create a shower surround. The glue had long ago failed and taking an actual shower without water leaking everywhere was a real challenge. (It can be done, but it's an art.)
We stripped out the surround and the glue-covered drywall to reveal the studs. Of course, on Sunday and Labor Day nothing resembling a lumber yard was open within 60 miles of Enon Hall so this was as far as we could take this project. I'm going to install a vapor barrier and concrete backer board and then tile. I will also install an exhaust fan and light. Right now there is no light at all at that end of the bathroom. We'll probably also need to have a shower door made to fit this odd space. Not very "period," but we (and our guests) gotta have a way to bathe without creating a flood!
One interesting find was the timber down brace visible in the photo on the right. These angled down braces (typical of early Chesapeake region construction) are found at every exterior corner of the gambrel portion of the house. The wall behind the tub is an interior wall. I'll need to do some research, but I don't believe that down braces were used on interior walls. If not, then this was originally an exterior wall; supporting our theory that the original house was one room down and one room up. My only hesitation in this theory is that this down brace timber is not as substantial as ones I have found at the exterior corners.
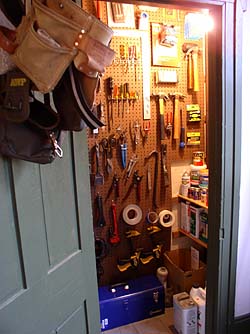
Since we couldn't buy the materials we needed for the bathroom, Gay and I made shelves for an unused closet to turn it into a tool storage space. The intent is to clean up the dining room which has, until now, been our "workshop" with tools scattered everywhere. This project proceeded well until we were ready for pegboard. And, of course, nowhere to buy it.
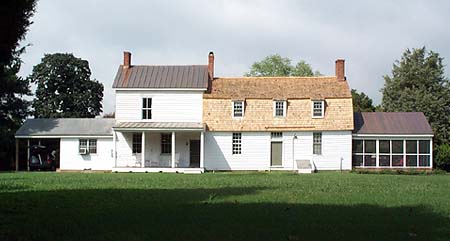
The roof is finished and looks great! The recent rain has already turned the copper to a nice brown color.
The new roof really accentuates all the parts of the house that now need paint. Hopefully, I can get away from the office for some extended time this fall and get the rest of the exterior painted.
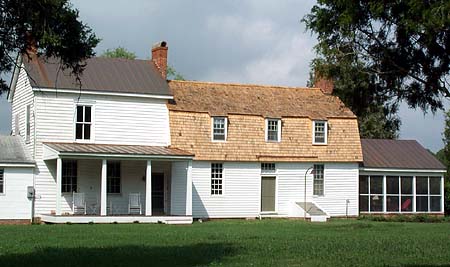
Back in December 2000 the rear of Enon Hall looked like this.
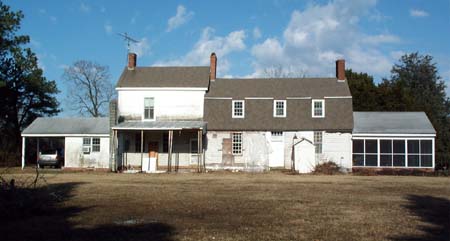
At that time I did a rendering of where I thought we were headed with the rear of the house. I knew I wanted to get rid of the doghouse entrance to the cellar and I thought standing seam metal might pull together the disjointed roofs.(Apparantly, I also thought the grass should be atomic green.)
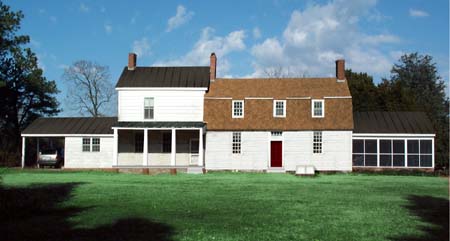
And today, here's where we are. Things are coming along! -- Bill
September 8, 2002
There was an incident this weekend involving kayak + camera + big wave + plastic bag with apparent hole in it. Therefore, there are no photos to share since my digital camera is now toast. I think the flash card is probably fine; I'll just need to find another Kodak camera from which to download the photos. If I can retrieve them, I'll post them here.
We installed pegboard in the our new tool closet and organized every tool we own. It's a thing of beauty. I couldn't stop opening the door to admire the accessibility of it all. No more digging and searching! And now that the dining room floor is clear of all of the tools, we'll be able to paint this room this fall. We're considering having our first Thanksgiving here this year.
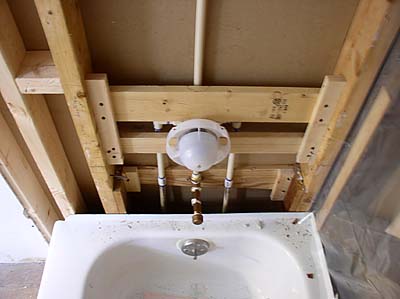
Worked in the upstairs bathroom installing studs for a new knee wall at the end of the tub to get rid of the water-catching ledge that was there. Not only did the ledge collect water, but it drained it right out onto the floor too. We also wouldn't be able to install a shower door with the ledge there. I used the new depth created by the knee wall to frame in a niche for shampoo bottles, etc. I also added more studs around the tub. Some of the stud spans were as much as 30 inches! -- Bill
September 12, 2002
The photos couldn't be saved. Oh well. Got a new camera! -- Bill
September 15, 2002
OK, with new camera in hand...here's our beautiful tool closet.
I went back to work on the upstairs tub, finishing up the framing and installing a vapor barrier. The framing looks like a mess in this photo. A lot of the new studs are compensating for too-wide spans or are positioned to anchor the future shower door to...or even to give me support in the corners for nailing the cement backer board. You can also see some shims on the old timbers to level everything out.
I pulled out the plumbing for the old faucet and shower head and redid everything to accommodate the new fixtures. Also installed cutoff valves in the cellar so that we can shut off water to this bathroom without shutting off the whole house. Once I was done installing the plumbing I turned the water back on and was surprised to not find a single drip anywhere. I think that's the first time THAT'S ever happened! -- Bill
September 22, 2002
Spent another weekend in the bathtub. Seems like this project is moving really slowly!
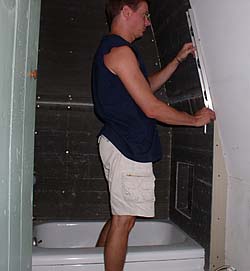
I got all of the cement backer board installed surrounding the tub. This is the first time I've worked with this material so it took me a little while to get used to it and master a cutting technique. Also had to keep shimming around the walls to get things square.
The next step is cutting a hole in the ceiling to install a light and exhaust fan. And then I'll be ready for the fun part...tiling!
Had a nice visit with a descendant of Captain John Hathaway (Charleen Evans-Thomas and her husband, Jay) who made the trip up here from Florida to do some geneaology research and visit Enon Hall.
Gay and her mom primed an old bed for painting and nursed the fig bush, which is still making a slow comeback. -- Bill
September 29, 2002
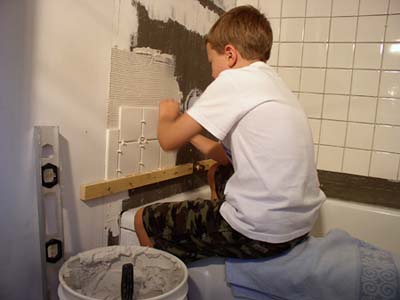
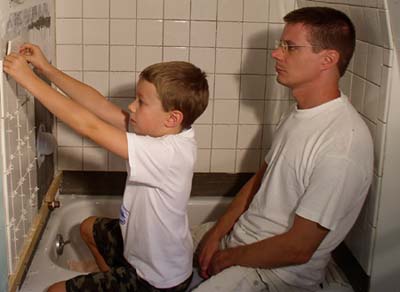
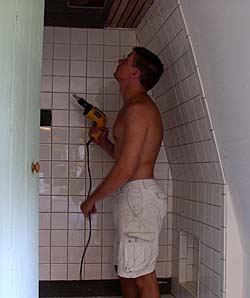
William and I tiled around the bathtub. Me more then him, but he did very well with his section and was a good gopher...hauling tiles upstairs, bringing cold drinks, and generally keeping me entertained.
Everything went very well until the ceiling. I cut a hole for the new exhaust fan. We got a ductless fan since we don't want a vent in the roof. (We'll see how it works.) Then I began installing the tiles. About half way through I wasn't happy with the way things were lining up with the wall (I started in the wrong corner of the ceiling) and decided to pull them all down and start over fresh in the morning. When I popped the tiles off I saw that the paint on the plaster ceiling had turned into gel and was coming right off with the tiles. I scraped off what I could of the mess but am now hesitant to go back over this for fear of a weak bond. Looks like I'll start in the morning by mounting a sheet of cement backer board to the ceiling. I have three options in mind for this:
1) Remove all of the plaster from the lathe so that I can attach the backer board flush to the surrounding plaster. This will create a big mess and could wind up damaging some of the new tiles on the walls in the process.
2) Mount the backer board right over top of the plaster using drywall screws going into joists and lathe. Downside is that I will have a weird edge to deal with somehow.
3) Drop the ceiling enough that I can finish the edge off with a small piece of tile. Maybe turning 2X4's on their sides as firring strips attached to the joists. Downside is that we would lose about 2 inches of headroom in an already small shower. We'll see what sounds good by the light of day. I'm taking off tomorrow from work in the hopes of getting this project completed. (Making a career out of it!)
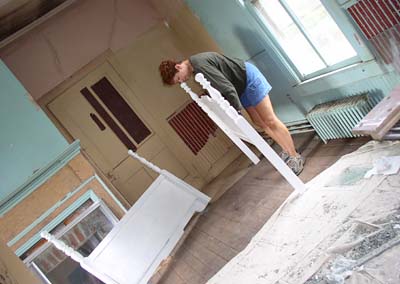
William took this picture of Gay painting a bed in the law office. His tilted camera angle draws attention to all of the colors in this room, as well as our numerous stripping tests around the room. We haven't done a thing in this room for a long time now but it makes a great space for projects like this. -- Bill
September 30, 2002
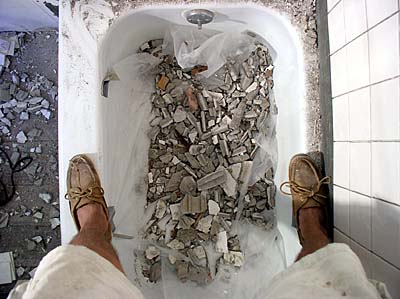
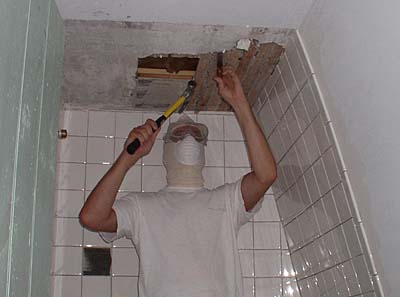
Well, can you tell which approach I took? I decided that rather than spend the next fifty years wondering if I was going to get clocked in the head by a poorly bonded tile that I should go ahead and do the job right. So I put on my head sock. And my dust mask. And my goggles. And some appropriate music and got to work.
Once I had removed all the plaster and cleaned up my mess I attached the backer board to the ceiling and was ready to begin tiling again.
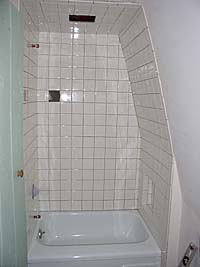
Amazingly, I had NO tiles left over once I was done! Next weekend I'll grout everything and then start putting the rest of the bathroom back together. (The missing tile is where the soap dish goes.) -- Bill
|